
Joshua Tree Photography Guide
Joshua Tree National Park, California

Welcome to Joshua Tree!
I’ve lived in Joshua Tree for about 10 years. I teach photography, so I get into the park often! I’ve put together a list of my favorite photography locations in the Park. Most of these locations are easily accessible.
Time-of-Day is an essential element of great photography. The best images are captured very early in the morning or during the golden hours around sunset (…and after sunset!).
Additionally, in Joshua Tree, we are a dark sky location - so we have the additional benefit of being able to photograph the Night Sky! Check out my Milky Way Guide for more information on how to find the Milky Way.
Enjoy!
Casey Kiernan
Joshua Tree Workshops

“You don’t take a photograph, you make it.”

Let’s get Started!
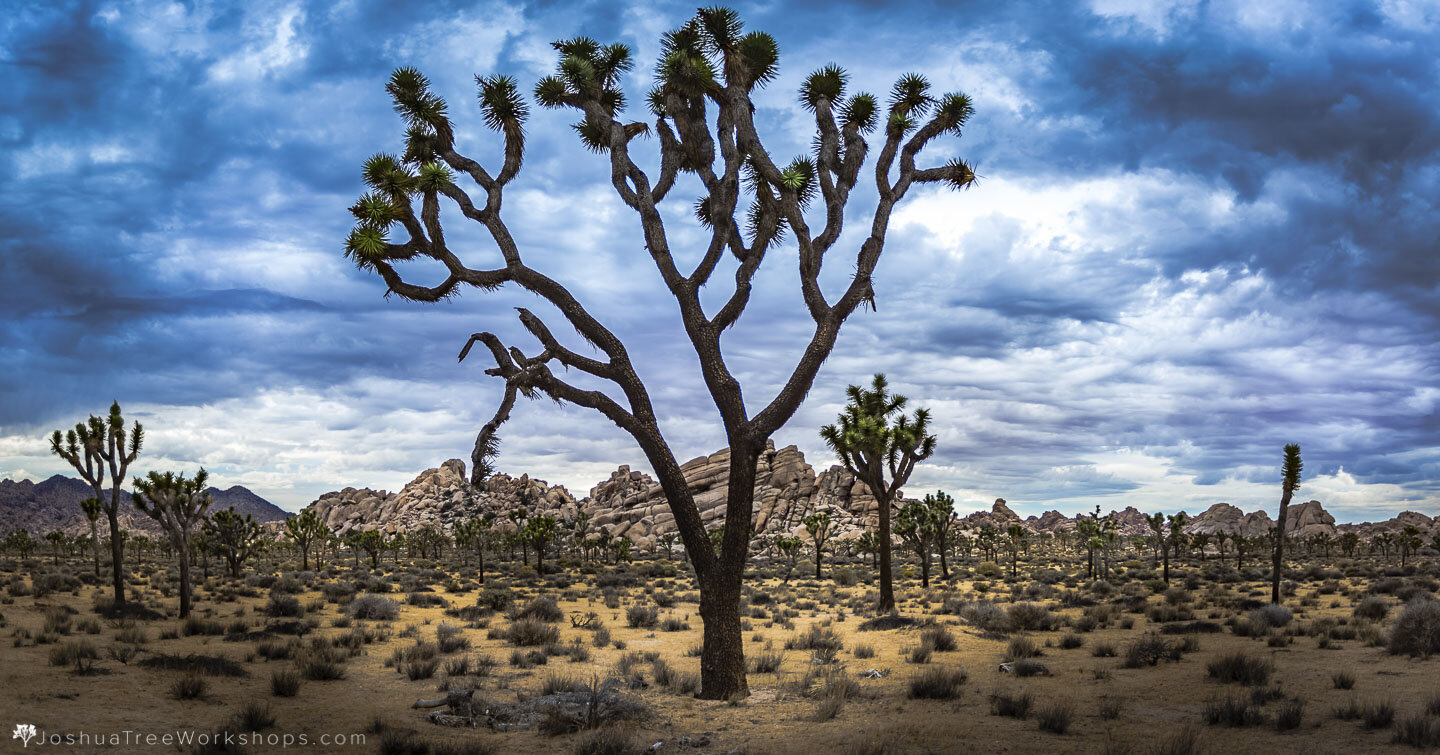
Intersection Rock
Intersection Rock is a “classic” photography location in the park. It's one of our favorite go-to spots for sunset. It is easy to locate from Park Blvd (the main paved road through the park). Just turn at the sign for "Intersection Rock,” across from Hidden Valley.
Park in the parking lot and grab your camera. Walk back on the road towards Park Blvd—staying near the road as you walk west. NOTE: really keep an eye on car traffic. Drivers are often distracted by the scenery and are not looking for pedestrians! You will come to a very tall (20+ ft) Joshua Tree near the road (pictured above). Position yourself so that the tree “complements” the shape of Intersection Rock.
You can take the picture right there next to the road, if you have a wide lens. If your lens is not wide enough to frame the entire scene, back up by crossing the street—keeping the position of the tree next to the rock (as above).
WHEN TO SHOOT:
Sunset—just before and just after the sun goes down—all seasons.
The setting sun creates an orange glow on the west side of the rocks (see image). If you're lucky, there will be some nice clouds—and maybe some climbers on the rock!
CAMERA SETTINGS
We prefer a wide angle lens at this location. If there are climbers, you can use a telephoto lens to zoom in.
Preferred Lens: Wide—24mm or wider. Long—100-200mm for climbers.
Program Mode: Aperture Priority—Canon "AV"mode/Nikon and others "A" Mode
ISO: 100
Format: RAW or JPG
White Balance: {Auto] [AWB] (Auto White Balance)
Aperture: F/ 8-11
Shutter Speed: Automatically Determined by Camera
Tripod: Yes

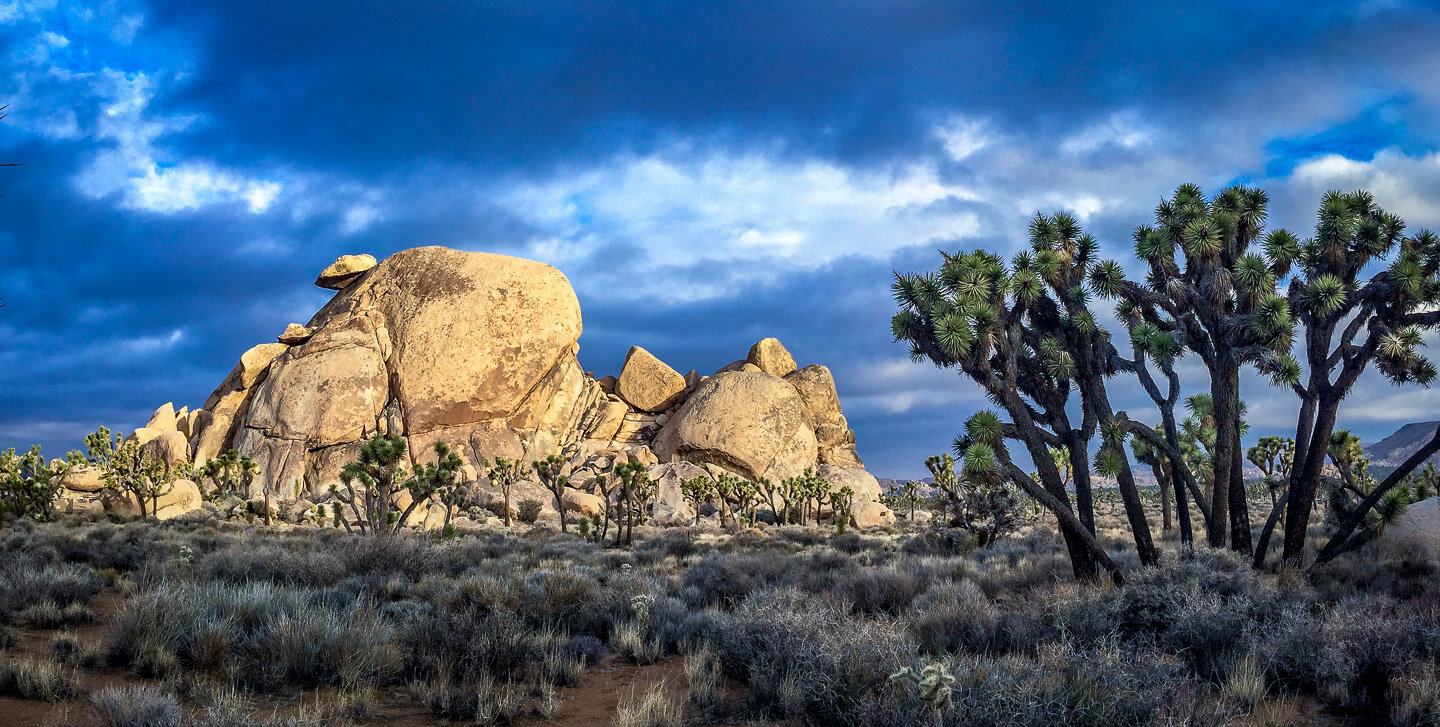
Old Woman Rock
Look for Climbers On the Rock!
Right next to Intersection Rock is “Old Woman Rock.” This amazing rock formation is another favorite spot for climbers. If you look closely, you can see the old woman's oval "head" with her arms outstretched—wearing a 1950's a-line dress.
Finding the Right Spot
From the parking lot, walk towards Old Woman Rock. When you get about mid-way to the rock, walk away from it, towards the road (not the parking lot). As you walk back, you will see some nice rocks and Joshua Trees that you can use to frame the picture (see image).
WHEN TO SHOOT:
Sunset: before and after the sun goes down—all seasons.
You want to get the shot just before or just after the sun sets. This will create an orange glow on the west side of the rocks. If you're lucky, there will be some nice clouds—and climbers!
CAMERA SETTINGS
We prefer a wide angle lens at this location. If there are climbers, you can use a telephoto lens to zoom in to get shots of them in action.
Preferred Lens: Wide—24mm or wider. Long—100-200mm for climbers.
Program Mode: Aperture Priority—Canon "AV"mode/Nikon and others "A" Mode
ISO: 100
Format: RAW or JPG
White Balance: {Auto] [AWB] (Auto White Balance)
Aperture: F/ 8-11
Shutter Speed: Automatically Determined by Camera
Tripod: Yes
Ancient Joshua Trees
They say that a typical Joshua Tree is about 150 years old. In your travels through the park, keep an eye out for the ancient ones: trees that are 200-500 years old! They are extremely special.
Finding the Right Trees
Heading east from Intersection Rock, take a right on the Keys View Road. There are many old-growth trees as you get higher in elevation, near Keys View. Make sure to park only in designated locations! NOTE: Never ever climb Joshua Trees or hang hammocks or other objects from them!
WHEN TO SHOOT:
Sunrise or sunset–all seasons.
You can shoot any time of day or night, but sunrise and sunset often have the most interesting light and sky color.
CAMERA SETTINGS
Preferred Lens: any lens
Program Mode: Aperture Priority—Canon "AV"mode/Nikon and others "A" Mode
ISO: 100
Format: RAW or JPG
White Balance: {Auto] [AWB] (Auto White Balance)
Aperture: F/ 8-11
Shutter Speed: Automatically Determined by Camera
Tripod: Yes
Cap Rock
Some Amazing Rock Formations!
Right at the corner of Keys View Road and Park Blvd is the Cap Rock area. You'll know it when you see it: there is a rock up high that defies gravity and looks like a jaunty men’s cap. In addition to ample parking, there are picnic tables for lunch or a snack. This is a nice area because of the self-guided walks around the rocks.
Finding the Right Spot
From the parking lot, take the self-guided tour—you will find many locations.
WHEN TO SHOOT:
Sunrise—just as the sun rises—all seasons.
You want to get the shot just after the sun comes up. This creates a glow on the east side of the rock. (See image). If you're lucky, there will be some nice clouds.
CAMERA SETTINGS
We prefer a wide angle lens at this location. If there are climbers, you can use a telephoto lens to zoom in to get shots of them in action.
Preferred Lens: Wide—24mm or wider. Long—100-200mm for climbers.
Program Mode: Aperture Priority—Canon "AV"mode/Nikon and others "A" Mode
ISO: 100
Format: RAW or JPG
White Balance: {Auto] [AWB] (Auto White Balance)
Aperture: F/ 8-11
Shutter Speed: Automatically Determined by Camera
Tripod: Yes

Keys View
Perfect for Sunsets
Keys View offers an amazing view of Coachella Valley, which includes Palms Springs and Indio. The elevation is over 5000 feet, so this is one of the first places to get snow in the winter (November - March). There are a few turnouts on the way up the road—it is worth stopping to hike around—the vegetation is much different up there than lower elevations. NOTE: always hike only on existing trails.
Finding the Right Spot
Drive to the end of Keys View road and park. Find an isolated spot on the rocks.
WHEN TO SHOOT:
Sunrise/Sunset—all seasons.
This spot is good at sunrise or sunset—or when there is snow! Cloudy days are nice as well.
CAMERA SETTINGS
We prefer a wide angle lens at this location, but any lens will work.
Preferred Lens: Wide—24mm or wider
Program Mode: Aperture Priority—Canon "AV"mode/Nikon and others "A" Mode
ISO: 100
Format: RAW or JPG
White Balance: {Auto] [AWB] (Auto White Balance)
Aperture: F/ 8-11
Shutter Speed: Automatically Determined by Camera
Tripod: Optional

Arch Rock
Just a 1/4 Mile Walk
Arch Rock is another "must see" photographic location in the park. Located in the White Tank campground, it requires a short hike to get there.
Arch Rock is a special place. There are lots of little trails behind it that weave in and out of rock formations. It's hard to get lost here because all of the trails seem to wind back to the camping/parking area. NOTE: always stay on existing trails! People get lost when they venture off across the open desert!
Finding the Right Spot
Drive into White Tank Campground. Proceed slowly on the dirt road until you find a spot (near a large dumpster) that says "No Parking." If you read it closely, it says "10pm-7am." Park here. DO NOT PARK IN A CAMPSITE’S PARKING SPOT! Please be respectful of the people camping here.
The short trail (1/4 mile) leads you right to the Arch. You will need to do a little bouldering to get to the spot across from the Arch. Be careful with yourself and your camera equipment. NOTE: do not climb on the arch! Rock formations are surprisingly fragile. Many arches—in other parks—have collapsed because people climbed on them.
WHEN TO SHOOT:
Sunrise or late afternoon—all seasons.
The best times to shoot are sunrise (as the sun peeks through the Arch) or late afternoon, when the sun lights the entire Arch (pictured). At sunset, the Arch is in the shade, but if there are clouds it can still be a good shot.
CAMERA SETTINGS
We prefer a wide angle lens at this location.
Preferred Lens: Wide—24mm or wider
Program Mode: Aperture Priority—Canon "AV"mode/Nikon and others "A" Mode
ISO: 100
Format: RAW or JPG
White Balance: {Auto] [AWB] (Auto White Balance)
Aperture: F/ 8-11
Shutter Speed: Automatically Determined by Camera
Tripod: Yes

Cholla Cactus Garden
Best at Sunrise!
This part of the park is off the beaten path. If you’re coming in from the south, i.e. the Hwy 10/Cottonwood entrance, you’ll pass this spot on your way into the main part of the park. This huge natural field of Cholla cactus includes the rare darker variety, known colloquially as “teddy bear” cactus. Views from this open vista in the Pinto Basin are of the Sonoran Desert—a very different topography than the rest of the park—which is in the Mojave Desert. This is another great spot for sunrise and sunset, but there’s something to see at any time of day—especially during the wildflower bloom in spring. Tip: one way to ensure you get here by sunrise is to camp at nearby Cottonwood campground.
Finding the Right Spot
In the morning, park in the parking lot and walk into garden along the many acres of boardwalk. NOTE: please stay on the path to protect the garden. Find a spot that has lots of cactus in your foreground, and shoot east toward the rising sun. Backlighting will cause the cactus to appear to glow.
WHEN TO SHOOT:
Sunrise—all seasons.
You’ll want to get the shot just as the sun rises. This will create an orange glow on the cactus. (See image). If you're lucky, there will be some nice clouds.
CAMERA SETTINGS
Preferred Lens: Any lens will do at this location
Program Mode: Aperture Priority—Canon "AV"mode/Nikon and others "A" Mode
ISO: 100
Format: RAW or JPG
White Balance: {Auto] [AWB] (Auto White Balance)
Aperture: F/ 8-11
Shutter Speed: Automatically Determined by Camera
Tripod: Optional

Skull Rock
Spooky at Night!
Skull Rock is right next to the road—you can't miss it! There is a sign and lots of car congestion on weekends. This is a popular place for a reason: the rock is super cool.
Finding the Right Spot
Skull Rock just east of the Jumbo Rocks Campground entrance. Park on the road walk in at the trailhead.
WHEN TO SHOOT:
Sunrise—all seasons.
Early morning is best, when the sun rises and creates dramatic shadows on the face. Bonus: less congestion early in the day!
CAMERA SETTINGS
We prefer a wide angle lens at this location.
Preferred Lens: Wide—24mm or wider
Program Mode: Aperture Priority—Canon "AV"mode/Nikon and others "A" Mode
ISO: 100
Format: RAW or JPG
White Balance: {Auto] [AWB] (Auto White Balance)
Aperture: F/ 8-11
Shutter Speed: Automatically Determined by Camera
Tripod: Yes

Sunrises!
Classic Joshua Tree!
Every season of the year provides great sunrises. You just have to be on the lookout for some wispy clouds in the sky!
Finding the Right Spot
You can shoot a sunrise from anywhere in the park, but try to find an area with lots of trees so that you have the best chance of getting a great shot!
WHEN TO SHOOT:
You need to get to the park before the sun comes up—while it is still dark (5am!)! Or better yet, camp in the park! Spring, summer, fall and winter! (See our camping guide.)
CAMERA SETTINGS
Preferred Lens: Any lens will do
Program Mode: Aperture Priority—Canon "AV"mode/Nikon and others "A" Mode
ISO: 100
Format: RAW or JPG
White Balance: {Auto] [AWB] (Auto White Balance)
Aperture: F/ 8-11
Shutter Speed: Automatically Determined by Camera
Tripod: Optional

Sunsets
Everywhere in the Park!
First of all, no matter where you are in the park, make sure you hang out to see the sun go down. Joshua Tree National Park is famous for its amazing sunsets.
For photographers: make sure to stay about an hour after the sun disappears. This is when the colors come out in the sky and you get those amazing deep blues, oranges, red and pinks.
Finding the Right Spot
On Park Blvd—east of the Hidden Valley area—there are many Joshua Trees that make great sunset pictures. As the sun is setting, walk around (looking west) and take pictures of different trees.
WHEN TO SHOOT:
Sunset—after the sun goes down—all seasons.
CAMERA SETTINGS
Preferred Lens: Any lens will do
Program Mode: Aperture Priority—Canon "AV"mode/Nikon and others "A" Mode
ISO: 100
Format: RAW or JPG
White Balance: {Auto] [AWB] (Auto White Balance)
Aperture: F/ 8-11
Shutter Speed: Automatically Determined by Camera
Tripod: Yes

See the Milky Way!
June-July are the Best Viewing Months!
On a dark, clear night, when the moon is not in the sky, you can find the Milky Way. This occurs every month of the year, but May through August are the best months for Milky Way viewing. (See our Milky Way guide.)
When to Shoot
There is some planning required to shoot the Milky Way in Joshua Tree National Park. (Check out our “See the Milky Way” guide).
The Milky Way “Core” is visible in the summer months when the moon is not in the sky. This happens only about ten days each month—so plan ahead.
CAMERA SETTINGS
Preferred Lens: A wide fast lens (maximum aperture of F2.8 or faster) is best. 14mm is optimal, but 20mm or wider is fine.
Program Mode: Manual mode (M) is needed for night shooting.
ISO: 1600
Format: RAW is preferred—this will require some post-processing (in Adobe Lightroom or Photoshop), but JPG will work!
White Balance: {Auto] [AWB] is fine, but 3200Kelvin is preferred (Don’t worry about this if you are not sure what white balance is).
Aperture: F/ 2.8 (or as wide open as you can go)
Shutter Speed: 20-30 Seconds (most professional cameras provide this setting)
Tripod: Yes
NOTE: Focusing is a challenge at night. You will need to set your camera to MANUAL focus and then focus on the stars (infinity). Try to make them pin points. This is a challenge at night, so just experiment.
COMPOSITION TIPS: Try to include something in the foreground—Rocks, Joshua Trees, your tent or your friends! Experiment!
Enjoy the night!

…and Wildflowers!
February - May
Wildflowers start blooming at the lowest elevations in the park (Cottonwood area) in February, then the higher elevations slowly catch up. The bloom can run through May, with different species flowering at different times. To find early wildflowers, enter the park at the south entrance (Hwy 10/Cottonwood). There are often lots of wildflowers right on the entrance road to the park. Continue driving into the park to see more varieties of wildflowers and you rise up in elevation. Cactus flowers bloom in April/May (after the wildflowers). Joshua Trees and Yucca plants bloom in the early months as well, but at higher elevations.
